Managing Patients in Bioscope
Last updated: September 2, 2026
Audience: Physicians and practice administrators who have completed account setup and need to add, edit, and manage patients.
1. Adding a New Patient
Video:
From the Patients page, click the + Add button in the bottom right corner.
Screenshot:
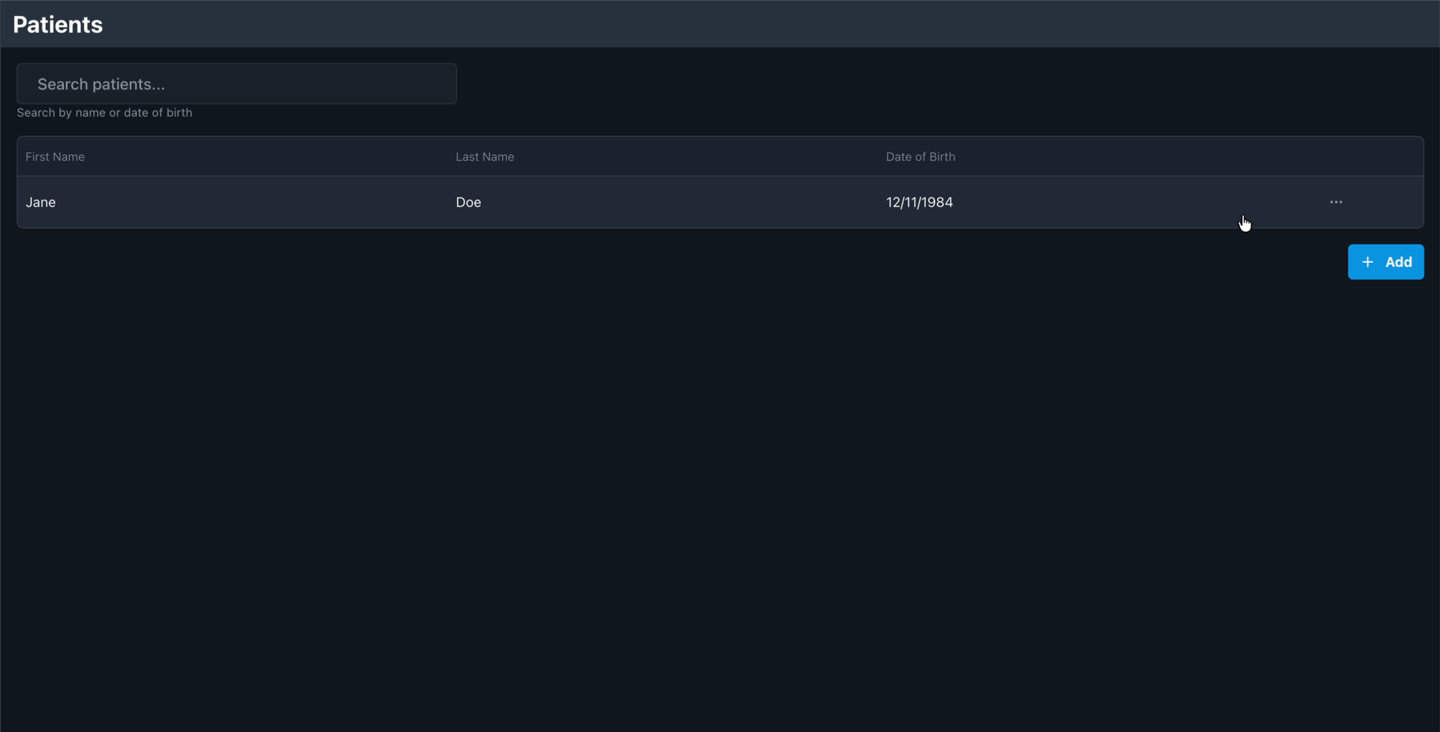
You'll land on the Add Patient form. Fill in the following fields:
Screenshot:
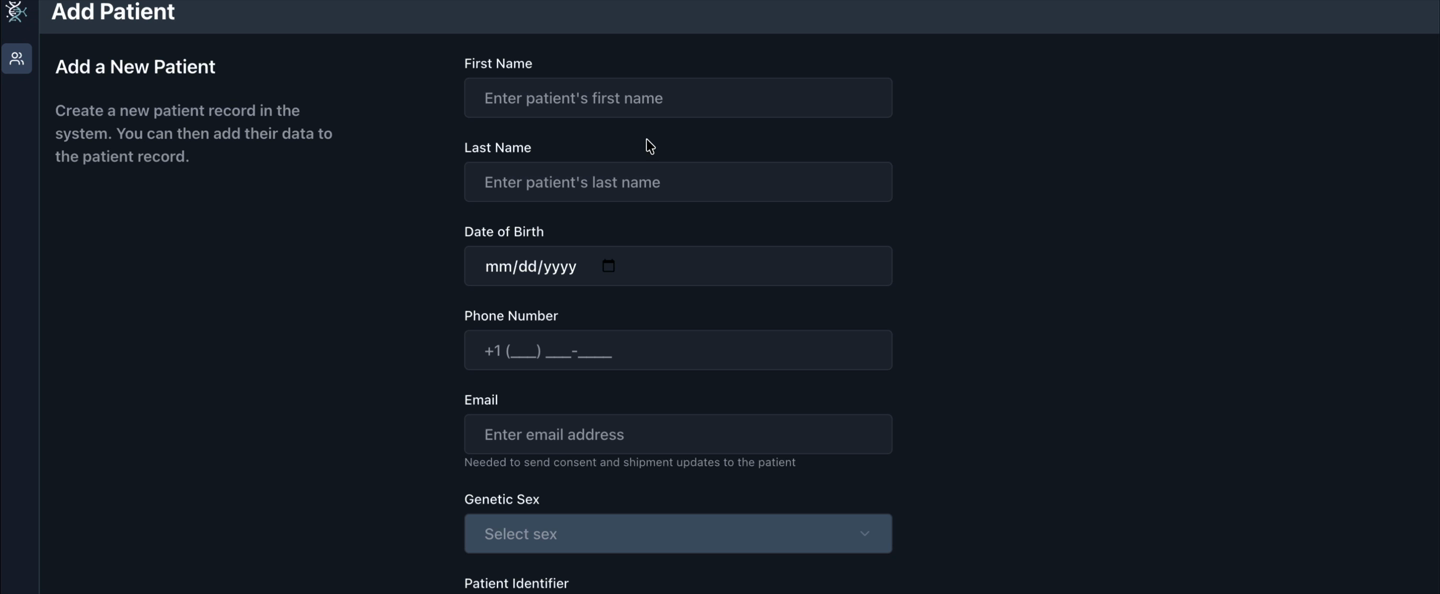
Required Fields
Field | Description |
|---|---|
First Name | Patient's first name |
Last Name | Patient's last name |
Date of Birth | Patient's date of birth (mm/dd/yyyy) |
Genetic Sex | Select from dropdown: XY (Male), XX (Female), or Other |
Optional Fields
Field | Description |
|---|---|
Phone Number | Patient's phone number — used for appointment and shipment notifications |
Patient's email address — needed to send consent and shipment updates to the patient | |
Patient Identifier | Your internal identifier for this patient. For Elation, use MRN. For Cerbo, use Patient ID |
Address | Patient's mailing address (Line 1, Line 2, City, State, ZIP) — this is where sample collection kits will be shipped |
Screenshot:
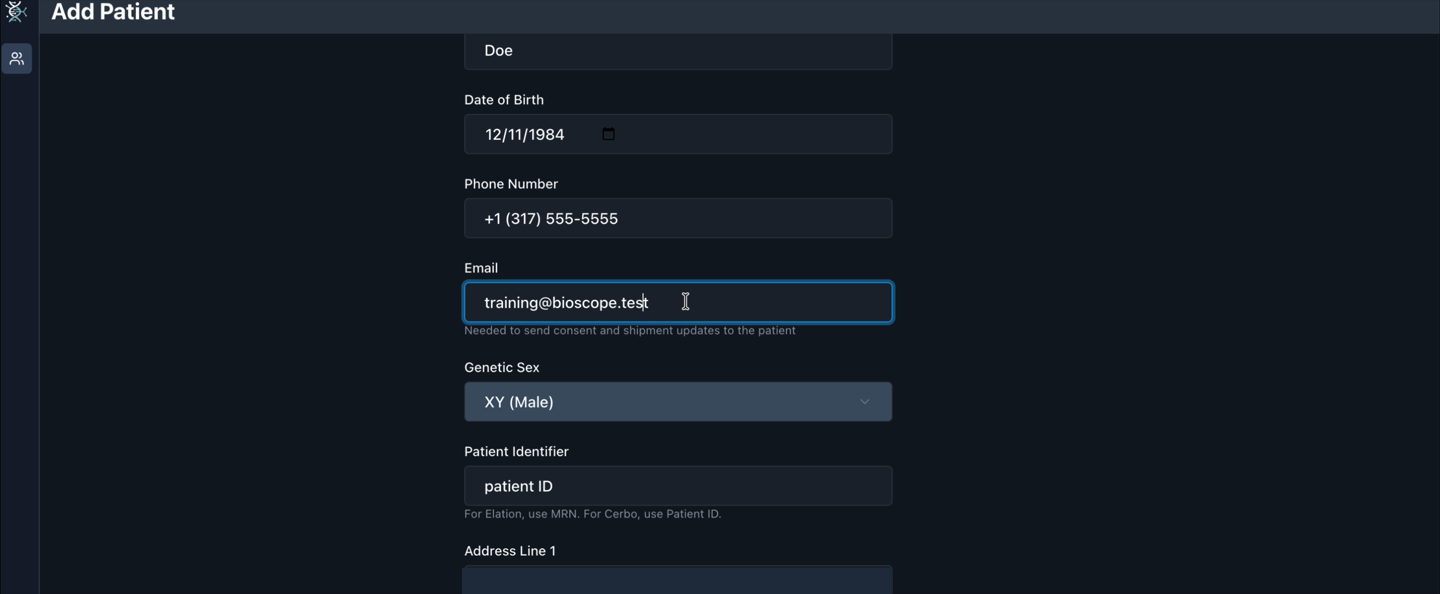
Once all required fields are filled, click Add Patient at the bottom of the form to proceed.
2. Selecting a Service Package
After adding a patient, you'll be taken to the Set Up Patient Access screen, where you choose the patient's service package.
Screenshot:
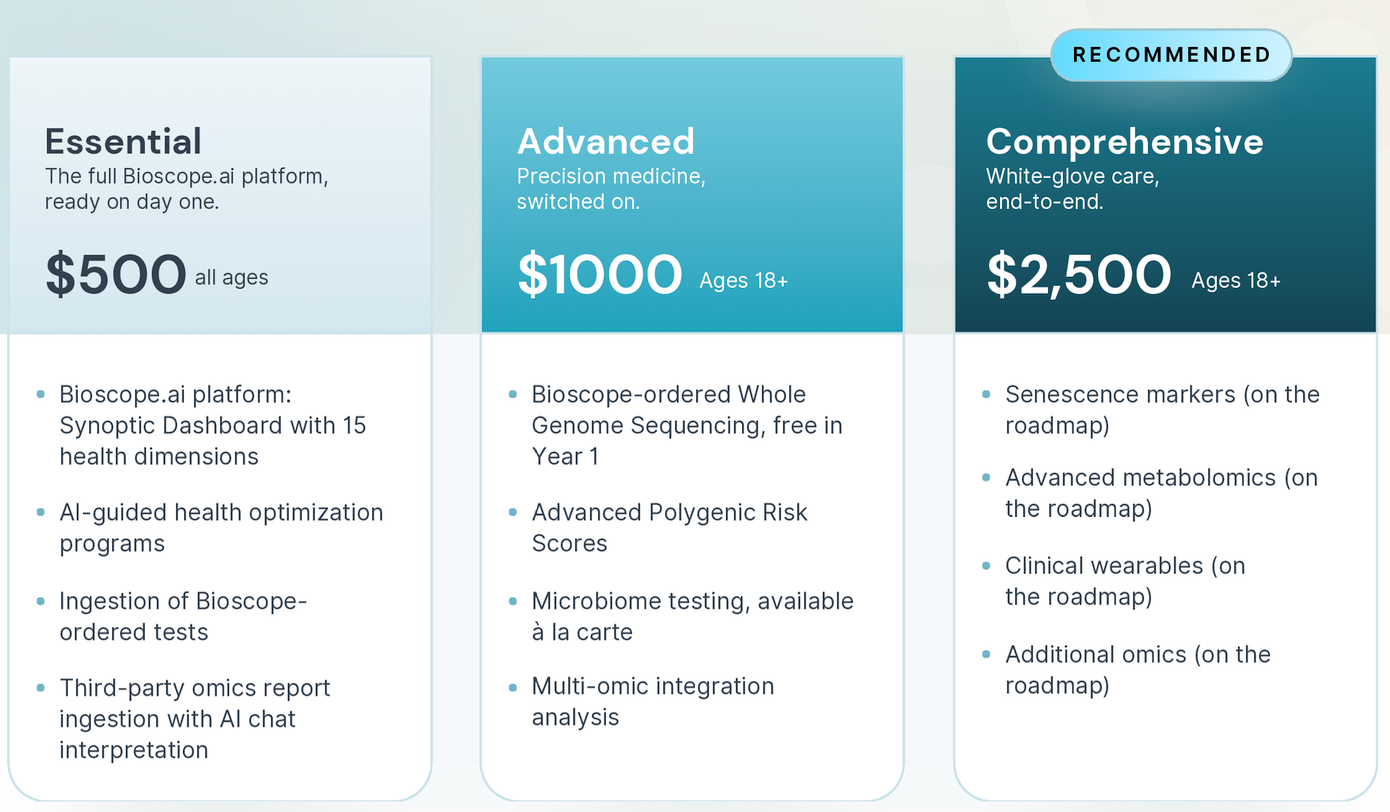
Bioscope offers three service packages, priced per patient per year. They are cumulative — each one includes everything in the package below it, then adds deeper diagnostics.
Package | Price | Ages | What it adds |
|---|---|---|---|
Essential | $500 | All ages | The full Bioscope.ai platform, ready on day one — Synoptic Dashboard with 15 health dimensions, AI-guided health optimization programs, ingestion of Bioscope-ordered tests, and third-party omics report ingestion with AI chat interpretation |
Advanced | $1,000 | 18+ | Everything in Essential, plus Bioscope-ordered Whole Genome Sequencing (free in Year 1), Advanced Polygenic Risk Scores, microbiome testing available à la carte, and multi-omic integration analysis |
Comprehensive (recommended) | $2,500 | 18+ | Everything in Advanced, plus senescence markers, advanced metabolomics, clinical wearables, and additional omics — all currently on the roadmap |
Included in every package
The platform foundation is the same whichever package a practice starts on:
Synoptic Dashboard with 15 health dimensions
Clinical Decision Framework (CDF)
DICOM imaging viewer
AI-guided optimization programs
Basic wearables integration
Bioscope-ordered results, which don't count against ingestion limits
Bioscope Connect patient portal
Third-party omics ingestion with AI chat
How analysis and testing are billed
Analysis and the omics-tab views come with the package. Physical testing is billed per test.
Package gates: Bioscope-ordered omics require Advanced or above. A patient on Essential cannot add them à la carte — moving up a package is the only route.
Third-party omics uploads: Reports you upload yourself are available as context for AI chat interpretation, but they do not populate Omics › Genomics or Omics › Microbiomics. Those are driven by Bioscope-ordered testing.
Note: Where a package includes testing, sample collection kits are shipped to the patient's address on file. The patient must provide consent for genetic testing.
Check the consent box at the bottom ("Patient has already provided consent for genetic testing") if applicable, then click Subscribe to activate the patient's account.
3. Uploading Patient Files
After subscribing, you'll land on Data › Data & files management. This is where you upload clinical documents and images.
Screenshot:
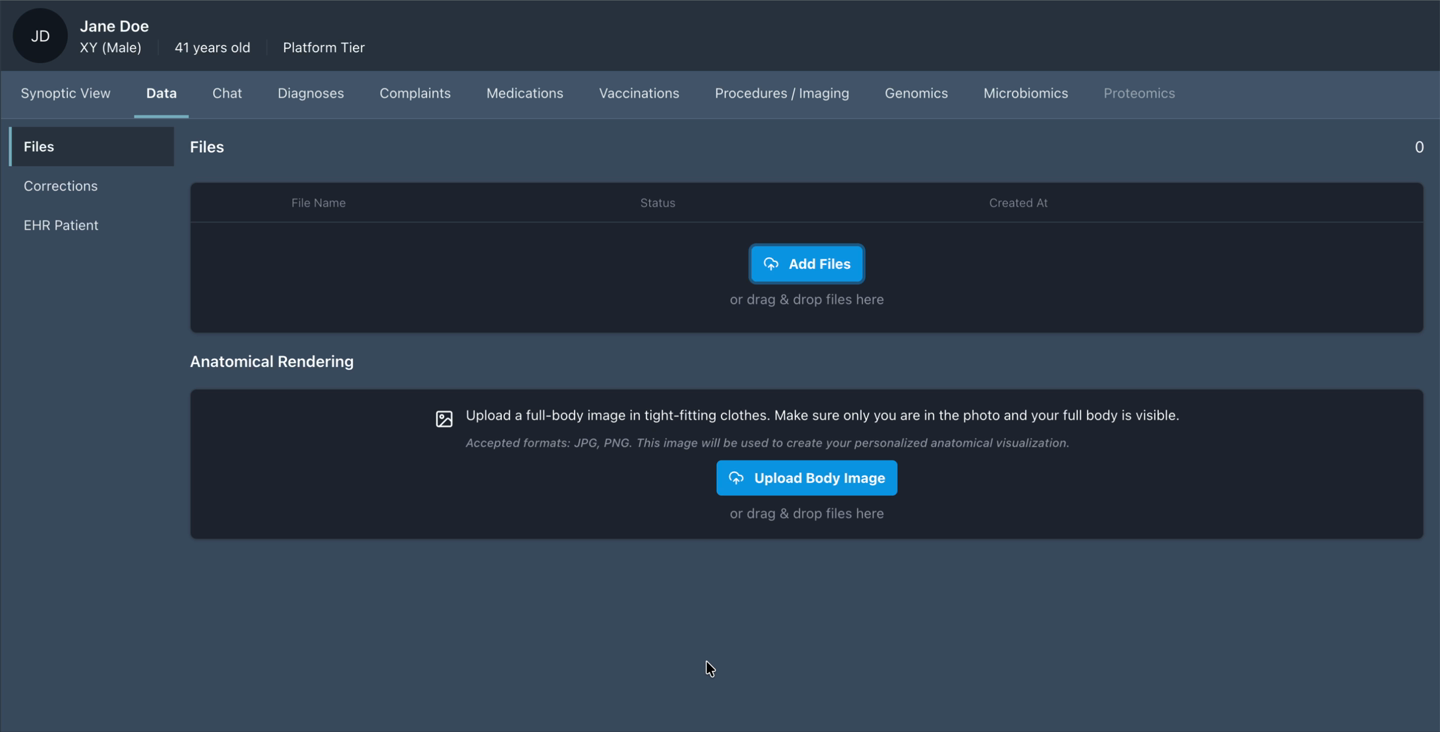
Patient Documents (Files)
Click Add Files or drag and drop files into the upload area. Accepted formats include:
PDF — lab reports, clinical notes, imaging reports
CSV / Excel — structured lab data
Other document formats — any clinical document you want Bioscope to analyze
Screenshot:
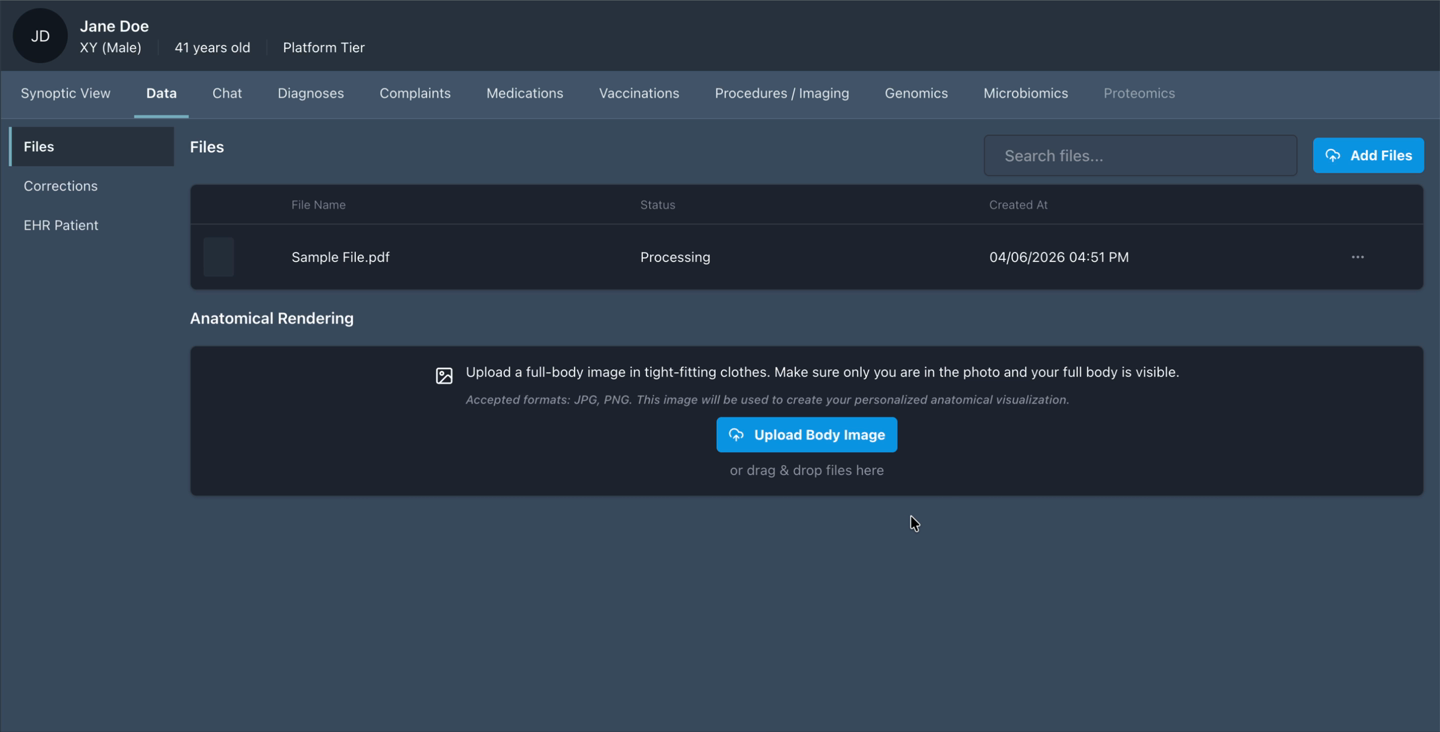
After upload, files will show a Processing status while Bioscope's AI analyzes the content. Once complete, the data will be reflected in the patient's Health dimensions and the Clinical record lists. Active diagnoses appear in the Summary and suggestions panel on the Synoptic view.
Anatomical Rendering (Body Image) (Optional)
Below the file upload area, there is a separate Upload Body Image section. This accepts image files only (JPG, PNG) and is used to create the patient's personalized anatomical visualization on the Synoptic view.
Note: This step is optional. You can skip it and return later from Data › Data & files management › Files.
Requirements: Upload a full-body image in tight-fitting clothes. The patient should be the only person visible in the photo.
4. Editing a Patient's Details
To edit an existing patient's information:
From the Patients list, click the ... menu (three dots) on the patient's row.
Select Edit to modify any of the patient's profile fields — name, date of birth, phone, email, genetic sex, address, or patient identifier.
Click Save to apply changes.
5. Adding Additional Patients
To add another patient after the first:
Return to the Patients list (click Home in the left sidebar).
Click the + Add button in the bottom right.
Follow the same steps: fill the form, choose a service package, and subscribe.
Each new patient goes through the same flow — Add Patient form → service package selection → Data › Data & files management for file uploads.
6. Inviting a Patient to Bioscope Connect
Bioscope Connect is a patient-facing mobile companion. You stay in Bioscope; the patient gets a clean list of only the reports you choose to share — written for them, not a copy of the chart.
Sending an invite
Open the patient's profile.
Click Invite to Connect in the patient header.
Review the invite dialog — it confirms the email address the invite will go to — and click Invite {patient} to Connect.
The header then reads Connect Pending until the patient accepts. Click it at any time to see the invite status, Resend invite, or Revoke access.
Pending patient invitations across your whole practice are listed in Settings → Account Settings → Pending patient invitations.
Sharing something with the patient
Nothing is shared automatically — you choose each item before it goes out.
A chat response — in any chat, select the Send icon at the bottom right of a response.
A PDF report — use Share PDF on the patient's Connect panel.
Shared reports are listed under Reports shared via Connect, each showing when it was shared and whether the patient has viewed it yet. You can attach a short note to the patient, Open or Download a report yourself, or Recall one you no longer want shared.
Connect is available on the patient's phone or computer; a computer is recommended for reading longer reports.
7. Updating Billing
Billing management is covered in a separate guide. See: Bioscope Billing & Payment Management for details on updating payment methods, managing subscriptions, and reviewing invoices.
Quick Reference
I want to... | How |
|---|---|
Add a new patient | Patients → + Add button (bottom right) |
Choose a service package for a patient | Automatically prompted after adding a patient |
Upload lab reports | Patient → Data › Data & files management › Files → Add Files |
Upload a body image | Patient → Data › Data & files management › Files → Upload Body Image (JPG/PNG only) |
Edit patient details | Patients → ... menu → Edit |
Add another patient | Patients → + Add button |
Give a patient access to their reports | Patient header → Invite to Connect |
Share a report with a patient | Patient → Connect Pending panel → Share PDF |
Stop sharing a report | Connect panel → Recall on that report |
This information is for clinical decision support and does not replace clinical judgment.
Last updated: August 2026