Setting Up Cerbo Integration
Last updated: September 2, 2026
Audience: Practice administrators connecting Cerbo EHR to Bioscope.
Prerequisites
Admin access to your Cerbo account
Access to Bioscope Settings (Account Settings tab)
Your Bioscope CSM's email for credential handoff
Step 1 — Generate API Credentials in Cerbo
Log in to your Cerbo portal (cerbo.io).
Navigate to the API User Management Console. For detailed instructions, refer to Cerbo's documentation: API User Management Console.
Create a new API user and generate credentials.
You will receive a Client ID and Client Secret.
Important: Save the Client Secret immediately — it may only be shown once.
Step 2 — Send Credentials to Your Bioscope CSM
Share the following with your Bioscope Customer Success Manager:
Client ID
Client Secret
Base URL — your Cerbo API endpoint (typically
https://[yourpractice].md-hq.com/api/v1)
Your CSM will configure the connection, or you can do it yourself in Step 3.
Step 3 — Configure the Connection in Bioscope
In Bioscope, click your name in the bottom-left sidebar → Settings.
Select the Account Settings tab.
Scroll down to EHR Connections and click Add Connection.
In the Add EHR Connection dialog, fill in:
Field | Value |
|---|---|
Vendor | Select cerbo from the dropdown |
Base URL | Your Cerbo API endpoint |
Client ID | Paste the Client ID from Step 1 |
Client Secret | Paste the Client Secret from Step 1 |
Under Resources to Ingest, select the data types you want to pull. Note that Cerbo supports a subset of resource types:
Resource | Supported |
|---|---|
Patient | Yes |
Immunization | Yes |
Medication Request | Yes |
Condition | Yes |
Observation | Yes |
Document Reference | Yes |
Encounter | Yes |
Procedure | Not supported by Cerbo |
Diagnostic Report | Not supported by Cerbo |
Allergy Intolerance | Not supported by Cerbo |
Care Plan | Not supported by Cerbo |
Unsupported resources are grayed out in the dialog and cannot be selected.
Screenshot:
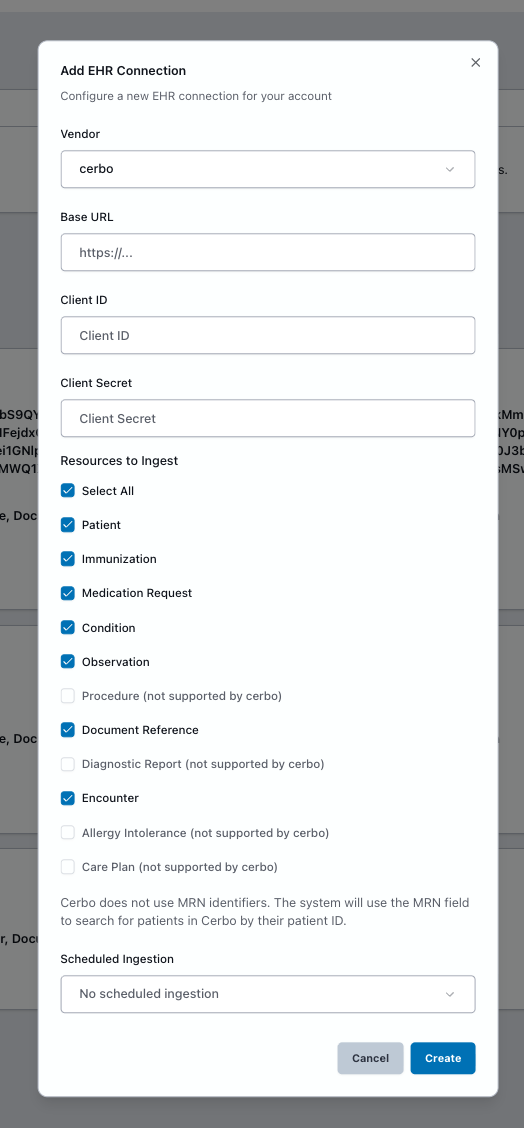
Patient matching note: Cerbo does not use MRN identifiers. The system will use the MRN field to search for patients in Cerbo by their Patient ID instead.
Optionally configure Scheduled Ingestion for automatic data syncing.
Click Create.
Step 4 — Verify the Connection
After creating the connection, verify it appears in the EHR Connections section. You should see:
Vendor: cerbo
Base URL
Resources: Patient, Immunization, MedicationRequest, Condition, Observation, DocumentReference, Encounter
Created date
Cerbo vs Elation: Key Differences
Feature | Cerbo | Elation |
|---|---|---|
API type | REST API | FHIR API |
Supported resources | 7 of 11 | All 11 |
Patient matching | Uses Patient ID (not MRN) | Uses MRN |
Procedures / Diagnostic Reports | Not supported | Supported |
Allergy / Care Plan data | Not supported | Supported |
Next Steps
Once the connection is active, proceed to Patient Matching & Data Ingestion to start syncing patient data.
Troubleshooting
Issue | Solution |
|---|---|
Credentials not working | Verify the Client ID and Secret in Cerbo's API console. Regenerate if needed. |
No data appearing for a patient | Cerbo matches by Patient ID, not MRN. Ensure the Patient Identifier in Bioscope matches the Cerbo Patient ID. |
Some resource types grayed out | This is expected — Cerbo does not support Procedure, Diagnostic Report, Allergy Intolerance, or Care Plan. |
Connection errors | Check that the Base URL is correct for your Cerbo instance. |
Need help? Contact your Bioscope CSM or email support@bioscope.ai.
This information is for clinical decision support and does not replace clinical judgment.
Last updated: May 2026